
One of the most common challenges when purchasing a pre-construction condo is not being able to physically walk through the space. This makes floor plans an important tool to understand all of your home’s features. Floor plans give a flattened, two-dimensional bird’s-eye view of a suite, showing things like structure, door and window locations, room layout and more. But if you’re buying pre-construction for the first time, a floor plan can look like an indistinguishable collection of lines and numbers. This easy-to-understand guide is just what you need to comprehend what you’re looking at on your next visit to a presentation centre.
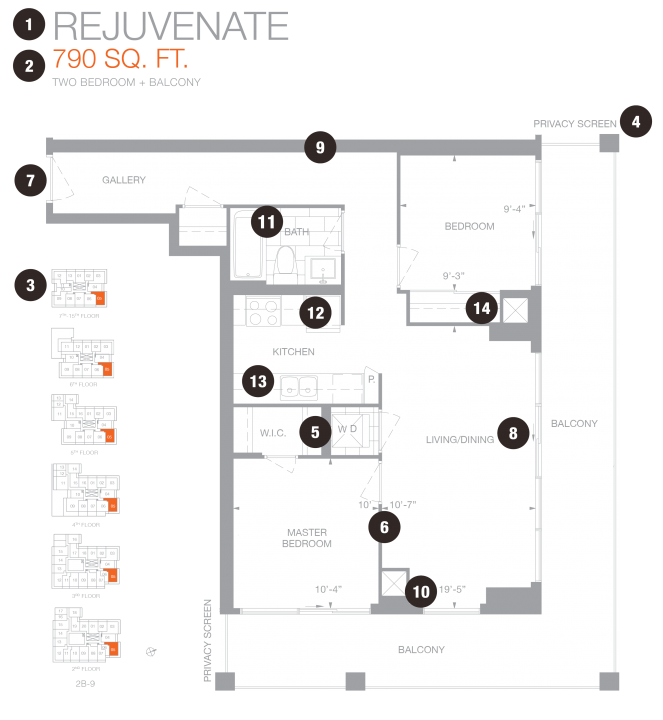
1. Name of Your Model/Suite
Each suite has an architectural name. At Empire, for ease of use, we give our model homes and suites project-specific names that you can easily remember and refer to.
2. Suite Information
Our floor plans plainly display the square footage and type of suite you’re looking at. This will often include the number of bedrooms, bathrooms, den and balcony or terrace.
3. Keyplate
Keyplates display the unit you are looking at (shaded) in reference to the other suites on that floor. This gives you more important information such as which floors that particular layout is available on, what direction your balcony faces, elevator location and what common walls you will share with your neighbours. It also includes a directional arrow so you can easily orient yourself.
4. Major Elements
Major elements in the floor plan will be labeled for ease of reading. These elements will almost always include the bedrooms, bathrooms, kitchen, balcony, den and living area and may also include other important features, like the Privacy Screen on the balcony and the Gallery foyer in the example above.
5. Commonly Used Abbreviations
Because of space limitations, you’ll often come across abbreviated words throughout the floor plan. Here are a few common ones you’ll encounter:
- W.I.C. – Walk in Closet
- W/D – Washer and Dryer (if shown together as with the floor plan above, that indicated the appliances are stacked)
- P. – Pantry
- STOR. – Storage area
- LN – Linen closet
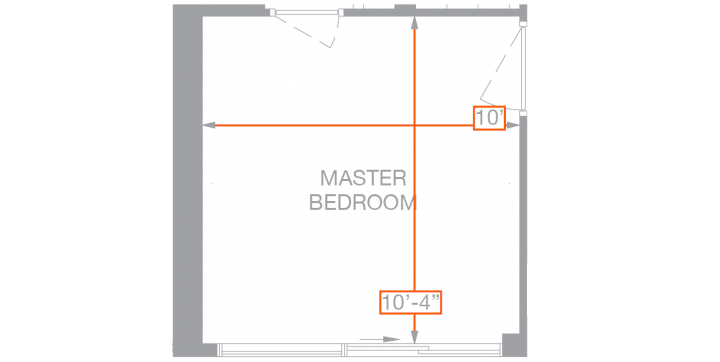
6. Dimensions
Throughout the entire floor plan, the dimensions of the various areas and rooms will be indicated in feet and inches. To clearly understand what the dimensions are referring to, arrows will be included. As with the example below, the master bedroom contains 2 dimensions and 2 sets of arrows. The dimension will be labeled next to its corresponding arrow which represents the distance between that arrow and its partner, as indicated.
It’s important to note that dimensions are measured from the center of the room and assume the space is a rectangular. The true dimensions can vary slightly with the shape and curvature of the room or with changes to construction.
7. Doors
All doors will be indicated by a dotted line in the direction it opens.
8. Sliding Doors
Sliding doors will be indicated with an arrow in the direction of the sliding door.
9. Walls
The various wall thicknesses will be indicated by different line weights. Thicker lines are used to indicated concrete walls, usually dividing your suite and that of your neighbours or the exterior of the building. Thinner lines indicate interior drywall walls. Shaded areas are used to show wall features such as concrete pillars, as seen in the living/dining area above.
10. Fan Coils and Vents
Areas represented with a large X and surrounded by a wall indicate the position of fan coils or vents. This is where the heating and cooling system for the suite will be. On some floor plans, the position of airflow will be indicated with a directional arrow.
11. Tiles
The presence of tiles and the various tile sizes will be represented by different sized squares on the floor plan. As indicated above, the tiles in the bathroom may be larger than those used in the laundry room. It’s also not uncommon to see part or all of the kitchen tiled, although this isn’t the case for every unit. Keep in mind that even if smaller tiles are indicated, upgraded tiles are often available in different sizes and colours. You can discuss your options with your sales or decor representative.
12. Furniture
Sometimes, we’ll display a floor plan with furniture in it. This is done to give you a better indication of the proportions of the plan, and how you can use the space. This does not necessary mean that the indicated furniture comes with the suite, although elements like the washer, dryer, fridge, stove and dishwasher will. Always clarify with your sales representative what comes with the unit if you’re unsure.
13. Cabinets
The presence of upper cabinets is indicated by a dotted line, as seen in the kitchen area above. This gives you an idea of their depth. Lower cabinets are built in and not specifically indicated, you can use vignettes and your sales and decor representatives to confirm the position and number of cabinets included in a specific kitchen layout.
14. Closets
Different closets will have different doors and built-in storage systems. The door will be indicated by either a swinging or sliding door icon, and the storage system will be show by a solid and dotted line, which represents a shelf and/or rod feature for clothing organization. With the example above, the master bedroom closet shows a swinging door that opens outward, and features a clothing storage system on each side, as the closet is a walk-in (W.I.C). The second bedroom features a sliding door and storage system along the entire length of the closet.
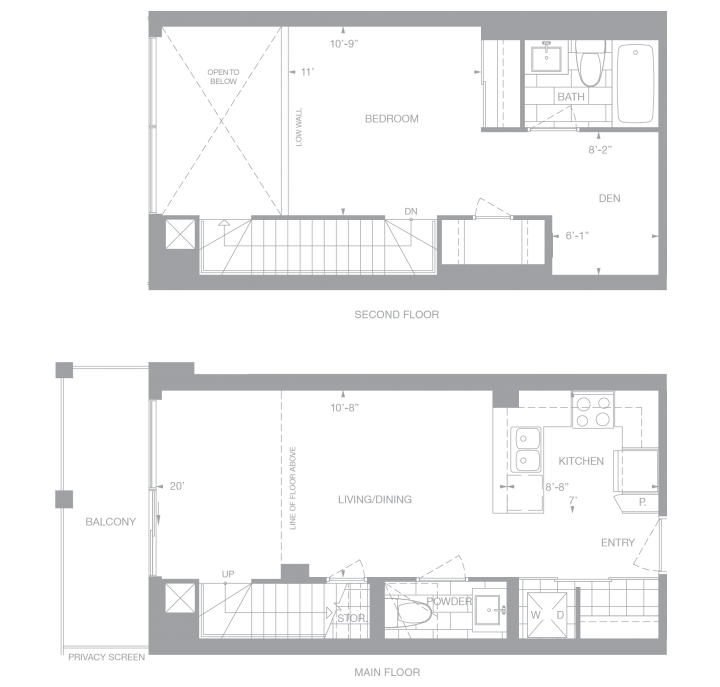
15. Multi-Level Condos
Multi-levels condos, as shown below can be a little more confusing to read as you have to understand how the relationship between the stairs and the open space on the second floor will all work together. When looking at a multi-level floor plan, the first floor will display the location of the staircase, any features under the stairs (in the example below it’s a storage area) as well as the direction of the stairs, marked with UP and a directional arrow. The second-floor layout will also display the staircase marked with DN for down, and an arrow in the opposite direction. Usually with condos, the second floor is open in some areas to view the floor below, and this area will be shown, as with the example below with a dotted X indicating the open area. Other elements will be clearly labeled, such as the Low Wall below, indicating a railing-type feature with a view below.
We find that the best way to really visualize your space is to use a combination of our renderings, model suites or vignettes where available as well as the help of our sales professionals. Start by visualizing yourself walking in the front door and take yourself through the suite to really understand how your space will work, look and feel. Not every floor plan will work for your lifestyle or living situation and that’s okay. And of course, if you have any questions, we’re always here to help you find the space that works for you. View our full list of condominiums in Toronto and in the GTA here.
For information on how to read your home’s floor plan, click here.